Tuesday, September 22, 2009

Monday, September 14, 2009

Kohlrabi, Two Ways (Part II)


I was a little hesitant about eating these raw. After all, "kohlrabi" apparently means "cabbage turnip", and frankly, I can't think of a single vegetable that would be more disgusting to eat raw than either a cabbage or a turnip... well, okay, maybe an onion... oh wait... coleslaw is raw cabbage, and I suppose I eat that occasionally... well, okay, raw turnips are still disgusting in concept!

Anyway, I got a suggestion to try them raw, based on this endorsement. The idea appealed to me nonetheless since I love raw radishes, dipped in a little salt, even more when served with toasted baguette and whipped, herbed butter, so I thought that perhaps, this might be similar in texture. But my uncertainty lingered. To settle the matter, I reserved one of three kohlrabi from our CSA share, chopped up the other two for roasting, and cut a thin slice of the last one for sampling raw to determine whether its fate would be to remain crisp in a salad or be roasted with its brethren.

The verdict should be obvious from the title of this entry. The flavor was slightly sweet and just a touch nutty, the texture crisp but firm with the little flecks of sea salt adding just the slightest hint of a complementary crunch. I sliced up the rest of that puppy (ooh-- bad metaphor, sorry!) and stacked them with slices of ripe tomato. The stacks sat on beds of arugula that had all been tossed with a lemon basil vinaigrette. This was such a refreshing salad due to the contrasts in textures, colors, and flavors. The anise flavor of the basil brightened the nutty flavor of the kohlrabi; the sweet, juicy tomato rounded out the peppery arugula; the soft tomato paired with the crunch of the kohlrabi. In fact, I think John and I liked this side dish better than the roasted kohlrabi: for him, it was the flavor, but for me, it was a texture thing since the roasting seemed to toughen the skin, which admittedly, could be corrected with better trimming.


2 medium tomatoes, thinly sliced
1 kohlrabi, thinly sliced
1 bunch arugula
Juice of half a lemon
2 tbsp fresh basil, chiffonade, divided
1 tsp honey
3-4 tbsp olive oil
sea salt and pepper, to taste

Lightly sprinkle the kohlrabi and tomato slices with sea salt and set aside. Wash and spin dry the arugula. Whisk together the lemon juice, honey, olive oil and some salt and pepper. Mix in half the basil. Reserve 1-2 tbsp of the dressing and use as much of the rest as you want to toss the arugula. Plate the arugula and then equally divide your tomato and kohlrabi slices in stacks between your plates. Spoon some of the reserve dressing on your tomato stacks then sprinkle with remaining basil. Best if chilled before serving.

CSA Count: 4
Kohlrabi, slicing tomatoes, arugula, basil

Friday, September 11, 2009

Kohlrabi, Two Ways (Part I)


I know I kvetch a lot about the dreary repetition of certain vegetables from my CSA, but every now and then, there's a brand new vegetable I've never tasted before which makes the whole investment worthwhile. After all, it was this CSA that introduced me to the deliciousness of garlic scapes in our very first delivery from them last year. I now anxiously look forward to the beginning of the CSA season for the few weeks that we get these curly, green miracles that are so delicious on pizza or even substituted for onion and garlic in guacamole.

But I digress. The week we got the kohlrabi was just such an occasion, perhaps appreciated all the more as they sat amongst a delivery of peas, green beans, and squash. I'd never tasted, let alone seen, a kohlrabi before so when we got the packing list at the beginning of the week, I researched what they were and put out a call for help as a Facebook status. I only got two responses, both from in-laws, but they were very helpful, although polar opposites. One suggested roasting, the other suggested eating raw with generous helpings of sea salt. Since both John and I were kohlrabi virgins, if you will, I decided to give both methods a try so we could maximize our umm... kohlrabi experience, get a sense of how the vegetable's taste changes as it cooks and what may be the method of choice for future kohlrabi dalliances.


In this post, I'll describe the roasted kohlrabi dish. I love roasted vegetables, that nutty flavor complemented by a slightly crisp edge to the vegetables. I particularly like vegetables that have roasted with some chicken since the vegetables get mixed with the juices and fat from the bird. I didn't feel like dealing with a whole chicken though, so I took advantage of an Amazon Fresh sale of 2 6oz chicken breasts with drummettes. Unfortunately, I was sadly mistaken since I assumed that the chicken would still be bone in, so to accommodate the length of cooking time for roasting the vegetables and prevent the chicken from drying out, I ended up wrapping the chicken with prosciutto, hoping that the outside hammy layer would keep the chicken moist while crisping up on the outside.

Once prosciutto was involved, I got inspired by saltimbocca dishes and decided to incorporate some sage. Fooled again-- the fresh sage bush which I had relied upon existing in my yard somewhere had apparently died when John moved it to a new spot to make room in the vegetable garden. I had to make do with dried sage, and I think that this could have been better with fresh. Rounding out the Italian inspired flavors was some fennel mixed in with the kohlrabi and mushrooms, which acted as a bed upon which the wrapped chicken sat.

The kohlrabi was sweet and nutty when roasted. The fennel's delicious anise flavor was a contrasting flavor spike and everything was mellowed by the earthiness of the mushrooms. Overall, this worked out to be a delicious one pot meal, but here are some things to keep in mind should I do this again: 1) trim the kohlrabi better as roasting wedges of the vegetable sometimes had a tough, chewy skin attached. Perhaps this may be enlightening (from one of the blogs I regularly follow); and 2) maybe don't bother wrapping the chicken with prosciutto since the result was soggy skin and I'd take crispy chicken skin over prosciutto wrapped, but soggy any day.


2 kohlrabi, cut into 1 inch wedges
8 oz cremini mushrooms, halved
1 small fennel bulb, sliced
2 6oz chicken breasts, skin on
2 pieces of prosciutto
2 tbsp unsalted butter, softened
1 tsp dried sage
1/2 tsp salt
1/4 tsp pepper
1 package fresh linguini
1-2 tbsp olive oil
salt/pepper to taste

Preheat oven to 400 degrees. In a roasting pan, mix together the kohlrabi, mushrooms, and fennel with olive oil and salt and pepper. Put in the oven to get a head start on roasting.

In the meantime, mix together the butter, sage, 1/2 tsp salt, and 1/4 tsp pepper. Carefully pull back the skin from the chicken and smear about 1 tsp of the butter mix all over the chicken meat and on the skin. Wrap each chicken in 1 piece of prosciutto. Set on top of your roasting vegetables and let continue to cook for another 20 minutes or until a meat thermometer says that the interior of the chicken has reached 160 degrees F.

Cook pasta according to directions, drain, and mix with remaining butter mix. Plate by putting a pile of pasta on the plate, topped with a chicken breast with some of the roasted vegetable mix on the side.

CSA Count: 2
Kohlrabi, fennel

Tuesday, September 8, 2009

Candied Plum & Fennel Creme Brulee

I can't say enough how much I love creme brulee. I love the copper brown sugar crust that looks like stained glass and love even more the cool, silky texture of the custard below. Amelie definitely got it right: taking that first crack at the sugar surface is such a simple pleasure and the moment should be savored.
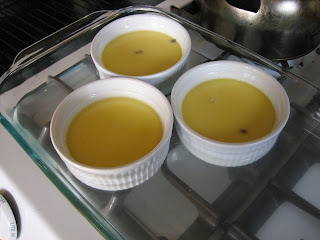
I also love creme brulee for its relative ease in making. I remember how much that came as a surprise to me. The first time I tried making creme brulee I used a recipe from a Ghiradelli white chocolate bar wrapper. Making the custard was no problem, the brulee part though... well, let's just say that I was inexperienced with broilers and so had no idea how hot they get. I set the timer for 10 minutes, thinking that should be long enough to burn the sugar. Turns out, it only needed 30 seconds to 1 minute. Although I ended up with a disgustingly charred black, bruleed to hell crust, the custard below was miraculously still creamy and delicious. I basically learned that I could scrape off my mistake crust and replace it with a new one with each serving.


Since then, I've really enjoyed taking the basic creme brulee recipe from Joy of Cooking and experimenting with different flavors/fillings, including blueberry, almond, and lemongrass (that's three different flavors, not one... but then again, that could be great!) Since there was fennel from the CSA and a whole bunch of plums from an impulse buy at Costco, I thought I'd try candying the fennel and plum as new creme brulee flavor.

This would be a fabulous dessert to make at Christmas time. My house smelled so warm and inviting while the fennel and plums were candying- kind of like Fig Newtons, actually. Once baked in the custard, they were sweet, spicy, and juicy in texture, similar to that of reconstituted raisins. And actually, I'd recommend saving the step of burning the sugar crust- I believe John and I both actually just liked the custard enough on its own and as John put it, the burnt sugar didn't add anything to the dessert. I think next time, it might be just fine if I did this as a panna cotta or as a pudding.


1/2 plum, slivered
1/2 fennel bulb, slivered
1 tsp fennel seeds
3/4 cup sugar
3/4 cup water
3 strips of lemon peel
3 large eggs
1 pint heavy cream
1/2 cup sugar
1 tsp vanilla

In a small saucepan, add the plum and fennel slivers and cover with cold water. Bring to a boil then drain. In the same sauce pan, mix together the 3/4 c of sugar and 3/4 c of water with the lemon peel and fennel seeds. Bring to a boil, stirring until sugar dissolves. Add the fennel and plum, and simmer for 45 minutes. Drain and set aside.

Preheat your oven to 300 degrees. Heat the heavy cream in a medium sauce pan until scalded (shouldn't boil, but little bubbles should form at the side and the cream should have a light steam coming out of it.) Boil water in a tea kettle while finishing making the custard. While heating the cream, beat together the sugar and eggs until well combined. Pour a little of the scalded cream into the egg mixture and beat fast to temper the eggs then gradually whisk in the rest of the cream. Add the vanilla and stir.

Set 4 large ramekins in a roasting pan. Evenly divide the candied mixture in the bottom of each ramekin. Pour in the custard mixture into each ramekin and gently stir. Set the roasting pan in the oven and pour hot water from your tea kettle into the roasting pan until water rises at least half way up the ramekins. Bake for 1 hr to 1.5 hrs. The custard should still jiggle when set. (TWSS!) Chill for at least 3 hours.

If you wish to brulee and don't have a torch, set a rack close to your broiler. Evenly sprinkle 1 tsp of sugar over the top surface of your custard and broil until sugar melts, making sure to check often. This probably won't take longer than a minute or two, depending on how hot your broiler gets.

CSA Count: 1
Fennel

Wednesday, September 2, 2009

Warm Green Bean Salad

We continue to slog through green bean hell. Tons of green beans for 3-4 weeks, and now they've mutated into Roma beans: long, flat beans that you cook like green beans. Having already pontificated on how boring I find this vegetable, I don't really have much to say in this post and will for the most part just jump into what I did. I will say this though: when a vegetable bores you to death, bacon is the key to invigorating things! My thoughts went to warm spinach salads with this one, cooking bacon with sweet onion and tossing that with warm, blanched green beans, fresh tomatoes, and a dressing made with mustard and dill. The end result was pretty wonderful for green beans: the beans were crisp and fresh, their taste mellowed by the sweetness of the tomatoes, the tang of the dressing, and the smokiness of the bacon. Huh... perhaps I should take my own advice when I tackle another 1.5 lbs of Roma beans next week...


1 lb green beans, ends trimmed
2 smallish tomatoes, chopped and seeded
1 small sweet onion, thinly sliced in half moons
4 strips Hempler's uncured bacon, diced
1 tbsp fresh dill
1 tbsp Dijon mustard
3 tbsp olive oil, divided
2 tsp honey
salt and pepper to taste

Bring a pot of water to boil and add the green beans. Cook 3-4 minutes and then drain and run under cold water.

In the mean time, add 1 tbsp of olive oil to a medium sized pan and heat over medium flame. Add the onions and the bacon and saute 7-10 minutes or until bacon is crisp.

While the onions and bacon cook, combine the dill, rest of the olive oil, honey, and mustard in a large mixing bowl adding salt and pepper to taste. Toss in the green beans and tomatoes and the bacon and onions fresh from the pan. Adjust salt and pepper if needed.

CSA Count: 3
Green beans, tomatoes, dill